If your critical business emails are landing in the spam folder, or worse, if phishers are spoofing your domain, your brand’s reputation and trust are at risk. Email security isn’t just about antivirus software; it’s about proving that the emails sent from your domain are genuinely from you.
At Get Fast Host, we prioritize the security and deliverability of your communication. This guide will walk you through setting up the essential “Triple Shield” of email authentication—SPF, DKIM, and DMARC—right from your cPanel, ensuring your emails reach the inbox every time.
Why SPF, DKIM, and DMARC Are Non-Negotiable
Setting up these three DNS records is the industry standard for improving email deliverability and protecting your domain from fraudulent use. Think of them as ID checks at the server level:
- SPF (Sender Policy Framework): Declares which IP addresses are authorized to send email on behalf of your domain.
- DKIM (DomainKeys Identified Mail): Provides an encrypted signature that verifies the email content hasn’t been tampered with in transit.
- DMARC (Domain-based Message Authentication, Reporting & Conformance): Tells receiving mail servers (like Gmail or Yahoo) what to do if an email fails the SPF or DKIM check (e.g., quarantine it or reject it).
If you’re running your website and emails on Get Fast Host’s reliable hosting, implementing these steps will significantly leverage our robust infrastructure for your email success.
1. Setting Up SPF and DKIM (The Easy Way)
Get Fast Host provides the cPanel interface, which makes managing these complex records simple using the Email Deliverability tool.
Step-by-Step Guide

- Log into cPanel: Access your hosting dashboard and click the cPanel button.
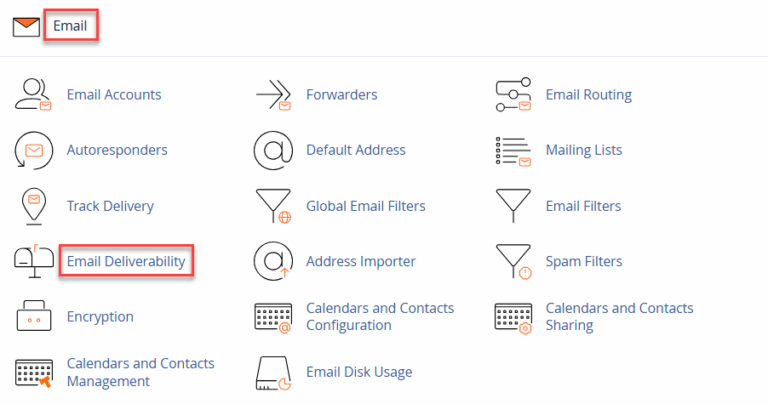
- Navigate to Email Deliverability: In the main cPanel screen, find the Email section and click on Email Deliverability.
- Manage Your Domain: You will see a list of your domains. Click the Manage button next to the domain you want to secure.
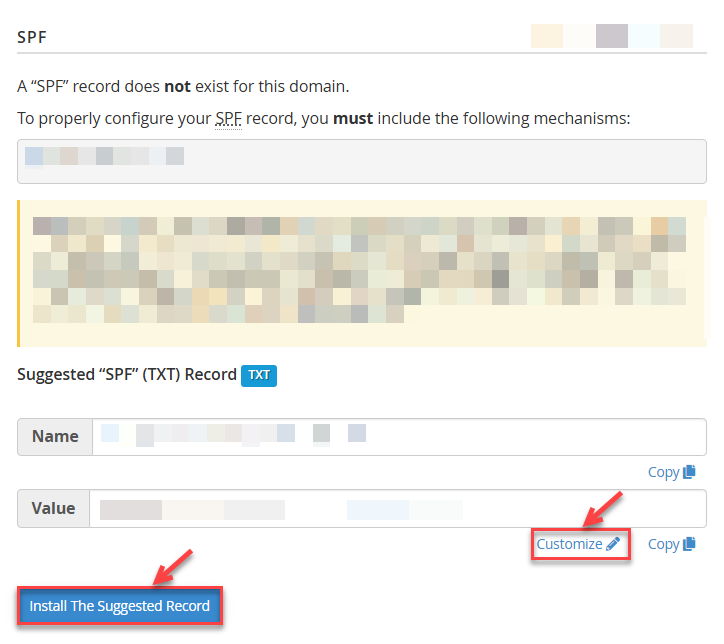
- Install Suggested Records:
- The tool will immediately show the status of your SPF and DKIM records.
- If they show “Problems,” simply click the INSTALL THE SUGGESTED RECORD button next to each one. This action automatically generates the correct record (a TXT record) based on our server settings and adds it to your DNS zone.
- The typical SPF record looks something like:
v=spf1 a mx include:spf.serverhost.net ~all
- Verify: After clicking Install, the status should change to “Valid.”

Get Fast Host Pro-Tip: The cPanel tool is the easiest way to ensure your records are perfectly aligned with our server’s IPs, guaranteeing high-quality Get Fast Host Email Security right from the start.

2. Setting Up DMARC (The Policy Enforcer)
DMARC is the final layer of protection. It requires a custom TXT record to be added via the Zone Editor.
Step-by-Step Guide
- Go to Zone Editor: Back in the main cPanel dashboard, find the Domains section and click on Zone Editor.
- Add a New Record: Click the + Add Record button next to your domain.
- Enter the DMARC Details: You will be adding a new TXT Record.

| Field | Value to Enter | Notes |
| Name | _dmarc | Must include the underscore. |
| Type | TXT | Select TXT from the dropdown. |
| Record (Value) | v=DMARC1; p=none; rua=mailto:youremail@yourdomain.com | See policy explanations below. |
Export to Sheets

- Save the Record: Click Add Record to save.
Understanding the DMARC Policy (p value)
The p= value in your DMARC record determines what mail servers should do with unauthenticated emails.
| Policy | Value | Recommended For | Action on Failure |
| Monitoring | p=none | Start here! | Take no action, but send daily reports to the rua email address. |
| Quarantine | p=quarantine | Once monitoring is complete. | Send failed emails to the spam folder. |
| Reject | p=reject | Highest security standard. | Reject failed emails completely (they won’t be delivered). |
Export to Sheets
Pro-Tip: Start with p=none for a few weeks. This allows you to monitor the reports (sent to the email you specified in the rua= tag) and ensure your legitimate emails are not failing authentication before you move to a stricter p=quarantine or p=reject policy.
Final Check & Call to Action
After adding all three records (SPF, DKIM, and DMARC), it can take 4–24 hours for the changes to fully propagate across the global DNS network.
How to Verify: Once propagation is complete, send a test email from your domain’s email account to a service like Gmail. If successful, you can view the email’s “Original Message” or “Headers” and confirm that the SPF, DKIM, and DMARC checks all pass successfully.
A secured domain translates to higher trust, better delivery, and a more professional online presence for your business in Nigeria and globally.
Don’t let email security and spoofing threats hold your business back. Get started with our secure, high-performance hosting today!
🌐 Secure Your Domain and Email with Get Fast Host!
Looking for the best foundation for your secure website? Get Fast Host offers the full cPanel suite, fast SSD hosting, and easy email setup.
➡️ Get Started: Check out our Affordable Web Hosting Plans and secure your next Domain Registration with us!


